Saturday, December 29, 2012

Precious Little Angel's & Cuddly Angel Cutout Card


Hello again my Dear friends!
Today I would like to share with you this adorable little angel card made from Precious Little Angel files.♠ Melissa kindly gave out her Angel cutting files to anyone that wanted to send a card to Sandy Hook Elementary school. This card and many more will be heading that way real soon. I will have a few ladies after the New Year help me put the finishing touches on them.
To view Melissa's beautiful cut files and the Precious Little Angel, click below.


 Mary's Angel and Cuddly Friends
Adorable Collection!
Leo & Mary's cutting files from svgcuts.com
"Christmas Cuddly Friends kit"
 .
Click below to get them all.


 These were made from Mary's collection that will be heading to Sandy Hook Elementary School also.

I made this file into a cutout card. I think they turned out so cute. Love Mary's cutting files!

It's been a Joy making these Angel cards and I can't wait to have the ladies join in.

My deepest sympathies goes out to all the family's, Children and people that were involved in that horrendous tragedy and pray that these little Angels will somehow comfort them.


YEAH!!!!!
My Fiskars Fuse arrived!
Remember I mentioned that I WON this amazing machine on FaveCraft site here. 
Yep, that's my name (Misty) on Day Ten!


I was soooo excited to win this machine that when I received their congratulations email, I jumped for Joy and called my niece, Lisa right away to tell her of the good news. We had been talking about this machine months before and when it appeared on HSN, I called and left a message on Lisa's friends phone. I said this is a wonderful machine and you need to get the whole bundle. Well, her friend Jan, did just that and gave it to Lisa. Lisa knew how much I wanted this machine and found the FaveCraft site Sweepstakes. The last day of the contest, she called me I think 10 times for me to enter the contest. She finally reached me at night. I remember saying, that I wasn't really comfortable sharing so much infor on any site, but reluctantly I filled out the form while she was still on the phone. She really insisted!! I sooo glad she did!
Well, the next morning I received an email congratulating me. I was still a little skeptical, so I emailed them from their site also and they confirmed that Yes, I had won and it would be in the mail soon. I kept checking my porch each day and after a few days, to my surprise it arrived. 
WOW! 
That box is Heavy, were the first words out of my mouth, then Thank you, Thank you, Thank you!
I opened it up with excitement and pulled out the Fuse machine. I kept saying WoW, WoW! This is what I had talked about and wished I had and now my dream came true. What a wonderful Present and just in time for Christmas. I am so grateful and thankful to Lisa for insisting that I fill out that form and to FaveCraft for picking little ole me!

I haven't had too much time to really use it yet, but I will be sharing with you all soon. Here are a few samples Lisa sent me that she made on her Fiskars Fuse machine.


I will use this one alot!!!!!

Yes, time for the New Year soon!
 Soooo cute! I love the deep embossing and the inking. This machine does cutting, inking and embossing all in one turn of the handle. I can't wait to try it out!
 

I love this one!
 All my creations are made with LOVE!

That's it for this year my friends! I have enjoyed creating and sharing with each and everyone of you. I wish you all good Health, Happiness and Success into the New Year. 
Keep watching as the New Year rolls in on January 1 2013!
I have lots of adorable creations to share with you.


Have a Happy New Year!
Hugs!
Free wallpaper


Thursday, December 20, 2012

Christmas SNOW GLOBE Shaped Shaker Card

Hello again my crafty friends!
Surprise Surprise!!!
I couldn't wait to share my adorable Snow Globe Shaker card with you today. 
This is the cutting file card that I used from "The Cutting Edge"!
You can get this file below

I'll be designing for Regina in January 2013!!
I just love how this card turned out!
 
I was inspired by Mary's Snow Globe Shaker Card over at svgcuts.com
You can get this file Free with purchase
 

I first cut a base card out in white card stock using my Sizzix Eclips cutting machine. I then cut the trees from the eCal library and did a silhouette of each one but selected rhinestones to the light green tree on the far left. For the snow hill I just cut a few swirls and inked with Tim Holtz distressed inks. I glued the trees and hill to the smaller globe insert and glued it to the card base. 
Then I separated the middle part of the face of the globe in eCal to cut only the outer circle. I made six cuts and glued them together to form the top piece and added a white textured paper on top and clear plastic. I did this also on the two white strips on the base of the globe but only used two layers of paper. 
I hope your still following me...lol 
Please email me if you have any questions and I will be happy to answer.
 
After I finished gluing them all together I put them aside and added about a tsp of silver white beads to the tree section. I then glued the outer circle with the plastic over the trees and beads. I finished off the bottom with a red piece of foil paper that I traced and added the white pieces to the base and topped it off with a Christmas bow.
That's my shaker card for today!
Hey, it really Shakes! LOL So Cool!

Close up of the Rhinestone design that I made in eCal software. 


I stamped a snowman and sentiment for the inside of the card. I bought the snowman
stamp at Michaels dollar bin and the warm wished is from Fiskars 35 ensemble.

 My Newest stamp is from my Favorite....Unity Stamps called "Dutch Mustard Soup" set. You have to see all the other stamps in this set!!  
You can get this stamp set  here... http://unitystampco.com/shop/dutch-mustard-soup/

I bought this set of stamps when they had the half off sale plus Free Shipping and I can't begin to tell you how perfect they all are. Super strong, etched red rubber and they work on my acrylic blocks. 
I LOVE THEM!!!
Check out their everyday sales on Face Book! 
https://www.facebook.com/pages/Unity-Stamp-Company/103252399709382?fref=ts


The adorable Snow Globe card  template is from The Cutting Edge.
Click below the go there!


This is Regina's beautiful card with the adorable Snowman!

Love the shiny sparkly paper and the darling snowflake ribbon!

That's it for today my friends!
I hope you have a wonderful day and keep an eye out
 for more exciting creations that will be flying in.

Hugs!

Wednesday, December 19, 2012

Home For The Holiday's Poinsetta Luminary Bag


 Hello my crafty friends!
I have another beautiful Holiday bag to share with you today. 
This time it's a Luminary bag!

Yes, you can place a tea light inside if you like.
This is another First Class kit from Leo and Marys svgcuts.com
You can get the "Home For The Holidays Kit"
Click below


This is an example of Mary's bags before the tea lights were added.

This is a pic of the lighted tea lights. 
Beautiful!!!

The bag folds completely up for storage! Yes, Mary thought of everything!

I added candy stripped ribbon and used some gold twirled wire and a plastic Christmas bulb
. I cut a small piece of green foil from a gift bag that I had
 and stamped on green card stock Ho Ho Ho. 
This time I put the tag on straight before I took the picture..lol

As you might have guessed, I don't have that many stamps....yet!
I Love the Unity Stamps!
Right now they are having a Special going on!
Check it out!
 

For the Poinsettia I used red foil from another gift bag that I had and glued it to the inside.

I really love this bag! 
It's so easy and quick to assemble and looks great for the Holidays.
Nice size for some soft slippers, socks or that special gift.

That's it for today my friends!
Keep watching as I will be posting a big surprise soon!

Have a wonderful week!
Hugs

Monday, December 17, 2012

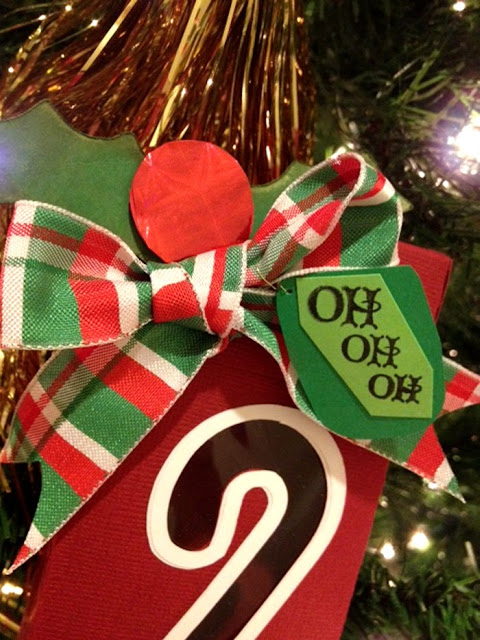
Holiday Candy Cane Holder Box


~~Hello my Crafty Friends~~
I have some wonderful News to share with everyone!!

I've been chosen to be on "The Cutting Cafe" design team!
Yes, little ole me! :)
I'm so excited to start creating and working with everyone.
You can view all the wonderful Designers below

I will be designing for Regina at the Cutting Cafe in January.
Soooo without further ado  (adieo French)
is this adorable
Candy Cane Box from 
The Cutting Cafe.
I just couldn't wait to start!!!
You can get this Fabulous cutting file below.

This is Regina's beautiful Candy Cane Box!
Gotta love it!

Hummmmm....do you noticed something that's just not right here??/
Well....it's been a lonnnng day! 
I just noticed that I put my tag on upside down....LOL Go figure!
Would you believe that I wanted it to say OH, OH OH...hehe
And these pictures were soooo  clear, that I decided not to retake them.
Sorry you will have to tilt your head a little, but you get the idea.
Too funny!
I hope I gave you a good laugh!!
HO HO HO

  The top cover comes off so you can add some delicious candies or  fresh baked goodies.
I just love how this box went together, so simple and fast.
I used  burgundy textured paper from Joann's. It's just the right weight for boxes.
 I used clear plastic page protectors for the backside of the candy cane and glued it on.
For the white candy came I glued two cut out together and then glued them to the front.
This would make a really quick and easy gift box for the Holidays.
Beautiful gift box!

That's it for today my Dear friends!
Have a wonderful week and keep watching for more exciting creations.

I can't wait to share about my Free Fiskars Fuse Machine that I won over at FaveCraft.
It will be here before Christmas!!! 
YEAH!! & HO HO HO!!!


Thursday, December 13, 2012

Christmas Classic Gift Boxes


Hello my sweet friends!
Today I finished up these Gable boxes and wanted to share them with you. 
These adorable four piece boxes are so easy and quick to assemble!

This box is from Mary's Classic Gift Boxes svg kit


 I used accent paper from "Old World Winter" stack. I just love their paper!

First, I cut out the base for the box in a solid colored heavy card stock paper. I then glued the accent pieces on and glued all the sides together. That's it!
You can decorate this super cool box for any occasion, depending on what papers you use. 
Great gift boxes for that special gift and they have a lot of room for a nice sized gift.
Great boxes!

That's it for today!
Have a great Friday and remember to keep watching for more exciting creations coming your way.

Hugs

Wednesday, December 12, 2012

Santa's Helpful Elves 3D Elf Shoe


Hello my Dear friends!
I'm sure everyone is very busy this time of year getting ready
for the Holidays.
 I've been busy with my students, plus my classes at Hobby Lobby and all my crafting.
And, my daughter put in an order for 50 Christmas cards to top it off....whew!
Very busy, but hey...I Love it!

I'm am sooooooo EXCITED!
I have to tell you that I Won a Fiskars Fuse Machine online!!!!
 Yes, Favecraft.com picked ME!
Thank you, Thank you Thank you!!!
Read about this amazing machine below!

Yep! It's coming to my door before Christmas!
Isn't that soooo cool!

My niece, Lisa already has one of these machine and loves it. Awhile back I was telling her
that I would love to get one so that I could use it in my classes. And HSN had a special on them, but I couldn't really afford to get it right now, so I passed. But, I was wishing for one.

And, I Won it!!
WOW, I guess what you think about, comes about!
I am so thankful and grateful to have won this machine. 
It will have a good home!
Favecraft made my Christmas very special!

Click below to go to Favecrafts website.
They have lots more Free giveaways!
Enter for a chance to WIN!
Good Luck my friends!

Today, I would like to share this adorable Elf shoe with you.
I just Love it!
Great to put special See's candies or cookies in for that special gift.
Also, you could put those cuddly wrapped up inside for your family or friends.
 A great keepsake!


I added green glitter accent pieces to the inside cuff and of course topped it will gold jingle bells.
 Here's a closeup of the glitter paper I used from The Coral Couture Stack. I just love their papers!
Their papers are nice and thick with special glitter on them. I picked it up at Joann's but I'm sure you can find it online or in Hobby Lobby.

This adorable little Elf shoe came from, yes your guessed it. Mary's over at svgcuts.com

Click here to get this kit FREE
Hurry before it's gone!


That's it for today my friends!
Keep checking back for more fun things to come.
Have a wonderful week!
Hugs

Sunday, December 2, 2012

Robbie The 3D Christmas Penguin


Hello my crafty friends!
It's that time again for me to share my creation "Robbie The Penguin" with you!
He was inspired by a wonderful and creative crafter named Debra Vineyard, that I had
the pleasure of meeting over on Mary & Leo Facebook page. She made such an 
amazing little Penguin that you just want to hug him.

Take a peek at her Adorable Penguin and my inspiration on her blog

Mary & Leo's Christmas Challenge
Click below to view All the Fabulous Entries!
You will see Robbie in the line up.
https://apps.facebook.com/offerpop/Contest.psp?c=235307&u=8498&a=254553244581393&p=109879932066&rest=0&v=View


Here's one of the first pictures that I took of Robbie.
 Here he is without his feet :)
Doesn't he look just grand sitting among the tree branches?
Hey, he's got FEET!
Added Snowflakes to his hat!
And, so began my journey!
I had been thinking of entering Mary & Leo's Christmas Challenge awhile back but 
was so busy with classes and orders that I didn't have the time. 
So when Saturday came, and I remembered Debra's Cute Penguin, I thought, I would create him using all the requird kits for the Challenge.

Boy, was he a Challenge!!
It would have been easier to use Debra's recipe! LOL
Thanks Debra for the Inspiration!

I changed his neck ribbon to plain red and left off the joy tag because I didn't ink it right. I also added the red striped ribbon to the rim of his hat and plain red to the top. I put dotted ribbon around his neck instead of the gingham. He had many changes...lol before the finished picture was taken for the Challenge.

I started creating Robbie on Saturday morning after I dl the Cuddly Friends kit from Mary's svgcuts site and had all my files in order.
It took me All Day to figure out how to get him just right. And, I almost  didn't finish him because I was having trouble getting his front body to cooperate and line up properly. I remember Mary saying, just tell the paper where you want it to go....but it didn't want to go...lol

Sooo...with much work, the pieces finally came together. Except, I put glue over the whole accent panels on each side of his head and it didn't look round.  I added another accent piece and this time only glued the top and bottom.

I'm so happy with the way Robbie the Penguin turned out!

Oh, the story on why I picked the name Robbie!

Debra was telling Grace, over on Mary & Leos facebook page that her Eclips machine was talking to her. 

Here's Debra's quote!
  "Grace, you will find the Eclips talking to you! Yesterday mine was saying "Hey Rob, hey Rob, hey Rob" over and over while cutting and I don't know anyone named Rob! And sometimes it sounds like a donkey braying! I like it!!!!"

Well, my machine started saying "Hey Robbie, hey Robbie, hey Robbie"over and over while
I was cutting the Penguin out.
 I don't know anyone named Robbie, but he must be related to Debra's Rob! ROFL

Hey Robbie!

Now Robbie is entered into Mary and Leos Christmas Challenge!
Thank Debra for the inspiration and being a great friend.

After I recoupe from hearing Robbie for the last two days, I will post the scut file and instructions for anyone that would like to hear his name..lol

Say goodnight!
Thanks for stopping by and have a Great week!

Keep checking back, as I will be creating more fun projects for you to enjoy.

Hugs!

Oh check these FREE Christmas Fonts at The Graphics Fairy! 
I tested the Lavendera and it cuts beautiful if you weld them in eCal.
You will need to put 0 in donations to get it Free.


Saturday, November 24, 2012

3D Amaryllis Flowers And Pitcher


Hello all my Crafty friends!
I hope everyone had a nice Thanksgiving with family and friends. 
This is the flower arrangement that I made for my daughter and she LOVED it!

Another First Class svg cutting file from Mary's svgcuts.com site.


Home For The Holidays svg kit

Get this Gorgeous First Class 
"Home For The Holidays Kit"
FREE

I used the Coral Couture paper stack for both the flowers and pitcher. 
First I cut the whole pitcher out in the light cream that you see on the top and bottom rims. Then I placed the accents pieces on the mat so I would get the front of the bird to line up.
You can see the tutorial here

Love the gold bird paper!

Close up of the dark red Amaryllis. 
My paper wasn't double sided so I glued two petal together which made them look and feel more real.


I doubled all the petals and inked them with distressed Tim Holtz inks.

This Amaryllis matches my ribbon accent.


For this flower I only had three of each color left so I made a mixed flower. 
I think it turned out nicely.


I thought some greenery would be nice, so I made my own leaves for my arrangement. I didn't have the dowel for the stems so I used clear hard plastic balloon sticks and they worked out fine.
I also added round colored glass and used a green block of oasis in the bottom of the pitcher, to hold the flowers and leaves in place and add some weight.

Click below for the leaves and flowers scut file.
Enjoy!


 My daughter and I went up to Moskatels craft store in LA, while I was visiting her. Wow, what a large assortment of crafty things! I found this really pretty ribbon that matched one of my flowers and some other ribbon, bells, etc. My daughter bought little birds and berries for her tree. 
We had a terrific day!

This set of leaves are single paper and inked, but seem to flop around instead of standing straight.
The next set of leaves I make will be doubled with wire in between so I can adjust them.

That's it for today my friends!
Have a wonderful weekend and keep checking back for new and exciting creations.


Hugs!