Friday, August 29, 2014

Something to HOOT About! FALL Owl Tissue Box


Hello my peeps!
I know you will just love this little Owl!
This little gem is from Miss Kate Cuttables. 

Click below for the Fall Owl file


I pieced and popped dotted the eyes and wing. For the breast I added orange glitter. 
Isn't this little Owl darling!


I used the Fall word titles from Miss Kate Cuttables

Five great titles to use for all your Fall creations.
Click on the link below


These cut like butter on my Sizzix Eclips machine. Great collection!


The tissue box is a Free file from Kerri Bradford Studios


You can view the tutorial at Crafts unleashed blog

That's it for another day!
Have a wonderful LONG weekend my friends. 
Hugs,
Misty


Sunday, August 17, 2014

Christmas Poinsettia and Snow Globe Box Card

Hello my lovely crafty friends!
Yes, I am starting early this year on my Christmas and Halloween projects.

I just had to share these beautiful Christmas box cards with you today.
 The Poinsettia and Snow Globe are
from Mary's "Christmas Box Cards svg kit"
See link below
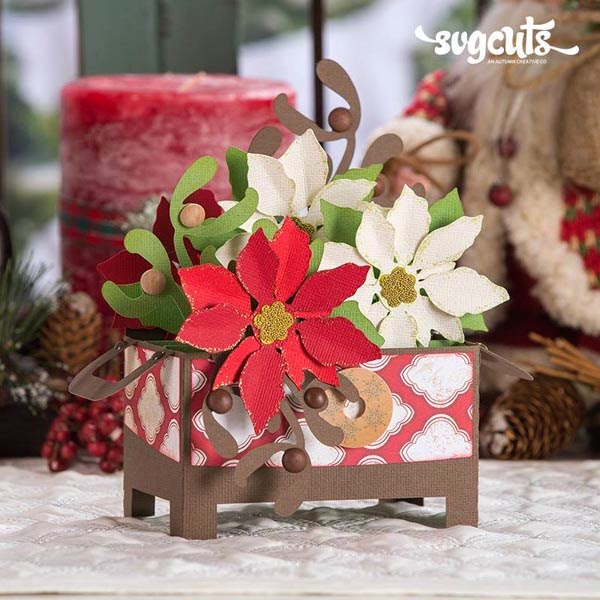
This is Mary's Poinsettia box card. I love how she used glitter around the edges of
her poinsettia flowers and all her special details. So beautiful!


This is an amazing collection of Box Cards!
Click below to get the Christmas Box Cards kit.

This gorgeous Poinsettia box card was made according to Mary's measurements.
It was so easy and quick to make. I really love how it turned out. 
I will be make more of these for sure.

This is the back of the card. I used tiny gold brads and stamped with a musical stamp.


I inked the red flowers with Tim Holtz inks and added a gem to the middle. The delicate poinsettia flower in the middle is a die from Tattered Lace. Gotta love their dies!
This is the card closed and laying flat. 
Super quick and easy card to make for that special person on your list.
This is a WOW card!!

This poinsettia box card is almost double in size of the previous one above.
It's hard to tell by the pictures, but it's a nice size. Not sure about an envelope
for this one. It would make a nice centerpiece on a table or counter.

This is the back of the card. I added an extra flower to finish it off.


You'll never guess what he'x made of!!!
He was just sitting there saying, pick me, pick me. haha
And, I did.
He was the perfect touch to a beautiful card.

Make your guess in the comments below this post and I post it on my next posting.

Tell me if you think he's made of paper, plastic,material, metal, rubber or ???????????
I'll have a special Surprise for all that post a comment.
Shhhhh I can't tell..... its a SURPRISE :)


What's the name of that song???
Let it Snow, Let it Snow, Let it Snow!
Yep, SNOW would be a cool surprise here in Apple Valley.
It's been in the 100's for weeks on end.

Soooo, that's why it's so refreshing to make snow cards with the Air conditioning running and Christmas music ringing through the house.. LOL

And, if I just happen to answer my phone, I may wish you Happy Holidays :) LOL

Am I the only one that does this???


Isn't this just the cutest Snow Globe box card you ever saw!!!

Yes, I still have glitter all over me. lol This was a fun card to make and will bring
a wow to the person receiving it. They can sit it on a counter or table to display all season long.

I designed Let It Snow caption in my Ecal program and it cuts out like butter. I welded the letters together,
so you don't have to glue each tiny letter.The words  "Let it "  is all one piece and "Snow" is one piece. I cut a shadow layer for each, so all you have to do is glue those two pieces together.
 Quick and easy!


What a great collection!
Take a look at all Mary & Leo's Christmas Box Cards!!!
I'll be making more of these for sure!

This is Mary's Snow Globe Box card. Beautiful card and gorgeous picture, Leo.
You can Click on the link to get this kit!


How this Back To School Caption Freebie  from Mary & Leo!
Click on the link below


That's it my friends for another day.
I hope that I've inspired you once again.
Have a wonderful day!
Hugs,
Misty


Saturday, August 9, 2014

Midnight Jamboree Halloween Pumpkin Clock


Hi again my friends!
I just knew I would be making a clock of some sort. If you know me, I Love clock. lol
I must have over 45 clocks throughout my home. Yep, I know that's a lot of noise, but I love all
the chimes.
When my son comes up to visit, he shuts them all down and takes the batteries out. He says
he can't sleep with all that noise. Soooo in the morning nobody knows what time it is :)
 Well,that's son for you lol


 I cut many layers of each piece so that the whole clock is like heavy cardboard. 
It can be hung on a wall or set in a stand. 
I love how it came out and will probably have him displayed on my wall around Halloween.
For the large base outside pumpkin I enlarged the tiny pumpkin and also made a smaller inside layer.
The fall leaves are silk and I added a few buttons and a bow.
Really fun project to make and so easy when you use Mary's files. If you would like detailed instructions, please email me and I will be happy to help you.

The kit I used for the clock face is Maison de Madeline 

Click on the link to get this kit


The kit I used for the small pumpkin is from the Midnight Jamboree 


Click on the link to get this kit


This is the back of the clock. I purchased the clock parts online at Timesavers.com
They have a great selection and ship very fast. Great company for clock parts.
If you are interested in obtaining the exact parts to make this clock, I would be happy 
to supply you with that information if you email me at the top right corner of this page.


Here's a FREE Vintage Witch svg  from Mary


One last thing to tell you before I wrap it up here.
Guess what?? I'm a Winner winner Chicken dinner over at Scrapbooking Made Simple Facebook site.
Yes, I WON this pretty Memory Box die "New Shining Candle"!
And, you know it will be something that I will use for my Christmas classes. Yippee!!
You need to go check Stacey's FB site out below!

That's it for another day my friends.
Thanks for stopping by and I will see you again soon.

Have a great weekend!
Hugs,
Misty

Wednesday, August 6, 2014

Haunted Forest Jack O' Lantern with Rosette


 Hello my sweet crafty friends!
I'm getting a head start on Halloween and wanted to share this darling Jack 0' Lantern
with you from the Haunted Forest kit here 
You can this kit FREE with purchase for a limited time 


 Mary's Jack O' Lantern is so cool!

This is the bottom of the Rosette that I used under my pumpkin. I think it's a good fit lol


This flower was so fast and easy to assemble with the hole already in the cut file. Just pop
a brad in and your good to go. Layer and curl them. I didn't ink them because I used two colors.

I made one in Orange Glitter paper. You will never guess what I used in the top
of the hat! You know the netting that hold your avocado's, lemons etc. I just
happened to save those and  knew I would be using them someday. lol


This one's for Leo over at svgcuts.com! Leo is a Big fan at Halloween and always brings
in all the ghost and goblins and flashing lites.

How about a FREE svg  Spiderweb from Leo & Mary
Click on the link below for the Spiderweb svg


That's it for another day my friends.
I hope that I've inspired you to start your Holiday crafting early.
Hugs,
Misty

Friday, August 1, 2014

Holiday Christmas Silent Night Light Bulb Boxes


Isn't he just the cutest snowman!
Just peeking in to share these adorable Light Bulb gift boxes.
The Light Bulb gift boxes are from the Silent Night svg kit
Leo & Mary

http://svgcuts.com/index.php?main_page=product_info&cPath=3&products_id=375


Isn't Mary's Light Bulb box adorable. I love the patterned paper she used and
the red & green braid is perfect. So many fun ways to decorate these darling boxes.

I was really only going to make one of these darling Light Bulb gift boxes, but I couldn't help myself. LOL
I wanted to add a blue one, but then I would need an orange, purple etc.
I may make a whole set to surprise my family members when they come for the Holiday.
They stand 10" Tall! 


They are a perfect gift for someone special and really make a WOW gift with
room for a gift inside to surprise them.


 The original size is 6" but I wanted to make them EXTRA LARGE, so I re sized them to 10" tall.
They are definitely a unique and adorable WOW gift. 
 For the tag, I used my Big Shot and foil from a gift bag and ran it through using the Christmas lite bulb die.
First time cutting out with my Big Shot, I usually only use it for embossing. That die worked perfect.
My favorite machine is My Sizzix Eclip that I use 24/7. It cuts just like butter :) I LOVE my Eclip!!

You can get a great deal on the Eclips over at Leo and Mary's site.

Read about Leo's Eclips2 review here

If you would like to purchase the Eclips2 


Click the link below
These darling Light Bulbs were so fun and easy to assemble that I couldn't stop making them. LOL
I can see them in all the colors of the rainbow and if I know me, I will be making them up before
Christmas time.


This card was made by one of my students, using the Big Shot and the envelope maker. We really 
didn't have any idea of  what we were going to make. LOL I think that's the fun of creating and picking things up as you go along.
 She started with the Gingerbread man from sizzix and ran it through the Big Shot.
Next she selected the yellow banner and cut it out using the Big Shot. She inked the leaves & red bow with Tim Holtz inks. 
I went looking for a sentiment to stamp into the middle and she selected JOY and added green 
gems. The tiny gingerbread are stickers that I found in my sticker drawer. I brought out the Christmas
\ribbon and the first one she saw was it! 
As for the matching envelope, that paper just stuck out and said, pick me. LOL
 I think her Christmas card turned out adorable and she loved it.


Leo & Mary's
FREE  Pretty Bell svg
Click the link below


I hope that I've inspired you to start crafting and get your creative juices running.

That's it for today my friends.
Hugs,
Misty