Tuesday, December 19, 2017

Christmas Heirloom 3D Illuminated Paper/Ceramic Christmas Tree svg

Just popping in before Christmas to show you this Amazing 3D
Heirloom Illuminated Christmas Tree. 

This gorgeous kit is from Mary's svgcuts.com collection.

You can get it by clicking on the link below
http://svgcuts.com/index.php?main_page=product_info&cPath=3&products_id=471 

Remember the vintage ceramic trees that every mom had?
Well, my mom was one of them. lol Yes, we had a white ceramic
tree just like this one and also a pretty green one.
I don't have them any longer, but we enjoyed them for many
years. In fact, I still have a handful of the tiny colored lights
that I happened to found in my craft room. :)
Yes, I don't throw anything out! lol


First up is my white tree that I made using my Sizzix Eclips2 and
it cut out like a dream. I used the Eclips2, first, because my daughter got it for
 me over the Thanks Giving Holiday. Second, because the score lines would cut
 lines for easier folding. Third, because it was brand new. The machine
 cut the glitter paper sooo fast and sooo perfect. I have the Cricut ExploreAir2
and also the Cricut Maker and will see how it cuts in Design Space, especially
the score lines.

It took lots of folding and plenty of glue. I've made many 3d projects 
from Mary's kits, but this was a new challenge for sure. And especially since
I picked out white glitter card stock that didn't want to stay glued.
Yes indeed, this is not for a beginner or faint at heart.
But, it's soooo worth it when you stand back and watch it
sparkle and glow.
I bought a set of led lights with a remote, so you change the colors.
Mary, suggests a plug in candle light, but I really enjoy all the colors.

A few pics of the different colors below.
It is sooo pretty in green.


Blue is so beautiful!


In lilac that matches my Cricut ExploreAir2 :) 

Reminds me of cotton candy!
I just couldn't stop clicking it on and off. haha

Turquoise is so cool.

Yes, all the patience and hard work paid off. For Christmas, I'll be
giving this gorgeous tree to my daughter. She will be so surprised
and I know she will have fun turning it off and on and watching
it sparkle during the day and especially at night.

Sooooo, since I'm going to be missing this super pretty 
tree, I'm going to be patient and start the hard work again, so I can
once again enjoy turning that little remote on and off. :)

Well folks, I hope that I didn't scare you with all the work
details to make this gorgeous tree. Just think of it this way,
it will be a cherished Heirloom Christmas tree for many year, 
and each time you click on those lights, it will be so enchanting. 
That's called Labor of Love!
Hey, I may have enough patience to make one for everyone
in my family......well, I'll have to think about that one. haha
Maybe if I had Four hands, one to hold it place and one to glue. lol


FREE FREE FREE

This Super fun FREE Christmas collection is from Mary at svgcuts.com

click on the link below for the FREE svg's


That's it for many long days and nights in my crafty room.
I do hope that you make one of these gorgeous tree.
You will be glad you did!
I challenge you to make one and share it on Facebook or my page.

Thanks for stopping by and have a wonderful and safe Holiday
Merry Christmas and Happy Hanukkah

Hugs,
Misty 

Friday, December 15, 2017

Christmas Leather/Faux Journals and Holiday cards


Hello again my friends. 
Yes, I'm in my craft room and I'm having
so much fun making all these lovely journals and cards for my
family and friends for the Holidays. 

This heart rose gold leather Journal cutting file is being offered 
FREE
from Jennifer Maker over on her blog here. 

Plus, each day she has special Christmas cutting files and surprises each day
that she shares with everyone.

 She's so sweet and very talented.
Take a look and you will be amazed.

Up first is the journal that I made using Faux leather from Cricut.com.
Everyone will love these! So quick and easy to make.
I used real leather for the bow and think it adds contrast.
Love love Cricut Faux Leather!
Jennifer used Real leather for her journal and it looks super. But, if you
don't have that, you could use most any material.


Amruta Tengase suggested sewing the journal paper up the middle. 
I used this gold metallic multi colored thread.

 I've never sewn on paper before, but it worked like a charm. 
I also used thin gold ribbon to hold the papers into place.

Up next is this pretty heart cutout Holiday card from white card stock. 
The only thing I changed from the original Faux leather journal were
the holes to hold the journal papers and to close it. I just used Contour in 
Design Space to edited them out.
 So fun!

Up next is my Silver Faux leather journal. I used a papered paper
on top of the white inside inserts to give it a different look. 
I love how it turned out! 
This one will be going to my daughter in Washington, because
I think she will love the color and silver Faux leather.


Up next is a Christmas tree card using white card stock again and
adding a green patterned paper to the back. A few jewels and some
pretty bows make this a gorgeous card indeed. So quick and easy
to make. You can use any Stencil or cutout for this project. Test 
with paper first to be sure it will cut right. 
Most of all have FUN!

Up next is my blue Faux leather journal. I was so inspired with
my first heart journal that I thought...hmmmm how could I make each
one different. I found this Angel in Design Space in Access under 
"A Quilted Christmas". As I'm writing this I see that when I used Contour, I
took off her right hand. lol Well, that could be part of her wing, right? haha
The Faux leather cuts like a dream with the New Cricut Maker.


Up next is the Angel card, but it's not finished yet. I'll add some
gold ribbon up the side. On the card, you can really notice the 
one hand missing. ;( I may just cut another one if I have time.

Up last is my favorite card! 
I just happened to buy foil bags last year and
thought how pretty this would be in different colors. I cut each foil piece out
and glued them with Glossy accents behind the white card base. 
Regular glue won't hold the foil.
I then added white card stock to over it all, so it was finished.
For the inside I cut red foil the length of the card and added white card stock
 for the  sentiment in the middle.
 I love how this turned out! 


Thanks Jennifer Maker for the inspiration and Free file.

Click on the link below to get the Heart Journal and more FREE
I hope that I've inspired you today.

That's it for another crafty day my friends.
Thanks for stopping by and have a wonderful weekend.
Hugs,
Misty

Sunday, November 19, 2017

Christmastime Gingerbread House Cards 3D Christmas Trees


It's beginning to look a lot like Christmas, soon the Bells will ring.
Yes, it's that time of year again my friends. 


This is Birds 3D gorgeous white Christmas tree that comes in her
complete collection for your Holiday crafting.
You can get this 3D Christmas Tree, plus the Gingerbread House Clock 
and Hanging Mistletoe, by clicking on the link below.

REAL Working Clock Gingerbread House!!
Yes, it's a real working clock and it also lights up.
See pic below!
Isn't this simply Gorgeous!
This is on my list to make, because I Love clocks!
What a wow keepsake or gift!!

Oh and don't forget the Mistletoe!!
Every house needs a little Mistletoe hung above the door, right? Add
a colorful bow or twine and you have this sweet decor for the
Holiday season.
Enjoy those Kisses and Hugs!!!

Click on the link below for the "Christmastime Collection By Bird"


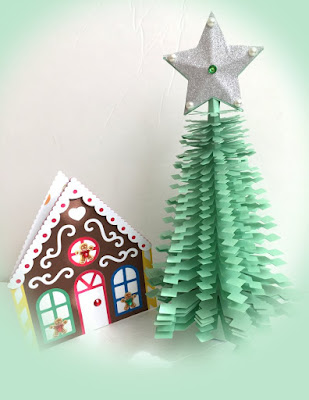
First up is this pretty Green 3D Christmas tree and Gingerbread House
card. The tree was so easy and quick to assemble that I just couldn't
resist making more. For the Silver 
star I cut glitter vinyl and put it on 
both the front and back. Added pearls and a gem. 
This cute tree can be taken apart by 
just taking all the branches off, since they
are not glued. Just store in a plastic container or
bag to use year after year.  

The darling Gingerbread House card was also easy and fun
 to make. And it has a perfect matching envelope.
  I placed little Gingerbread stickers and gems. You can make these 
cute cards or have your family join in the fun for someone 
special on their list.

This is Birds Pretty Gingerbread House card in soft pink.
Love the matching envelope!

Up next are Red and pink Candy cane Gingerbread House
card and matching tree. So fun and quick to make for your
Holiday gift giving. I think I'll make them in the
colors of the rainbow for all my family to enjoy. In fact
I may just cut them out and let them pick and mix
all the colors so they can make their very own special tree. 
So fun!

 Next up is my Blue and White Christmas tree and matching card.
I think this one is so pretty and looks like a winter wonderland. This set
could be given for Christmas or Hanukkah, since it's in the blues. You
may replace the star with a six sided one if you wish. I also used Gold glitter
vinyl for the star and gems. Beautiful collection!

How about a Fabulous Freebie today!!


Free Bundle Box from Bird!
For all your Holiday gift giving.
Click on the link below


That's it my friends for another crafty day.
I hope that I've inspired you to start your Holiday crafting soon with
this beautiful collection.
Happy Crafting!
Hugs
Misty

Sunday, October 1, 2017

Shriek! Halloween Bat Faux Leather Pop Out Card EEK!


Oh my, it's that month again and you know what that means. 
Yes, it's time for all those ghosts and gobblins that make Halloween
 Spooktacular on October 31th. As you can  probably tell I prefer 
the not so scary things, just because I'm a scaredy cat. haha


This is the Pumpkin that my mom made years ago, gluing two pieces of 
poster board together with Elmer's glue and then quickly cutting it out before 
the glue dried.  She traced the pumpkin face on and then painted in each part 
to make this extra large ( 15" x 13") pumpkin that she put on her door each year.
 I still have him and will display him proudly this month.
He has that special look that makes you just want to Smile for sure. lol

I even made a cutout card of him and she simply loved it.
Lots of memories!

Next up is the Creak 'n' Shriek collection by Bird.
This is an amazing new kit that is on sale over at  Birds.
Click on the link below to get the Halloween Creak 'n' Shriek kit

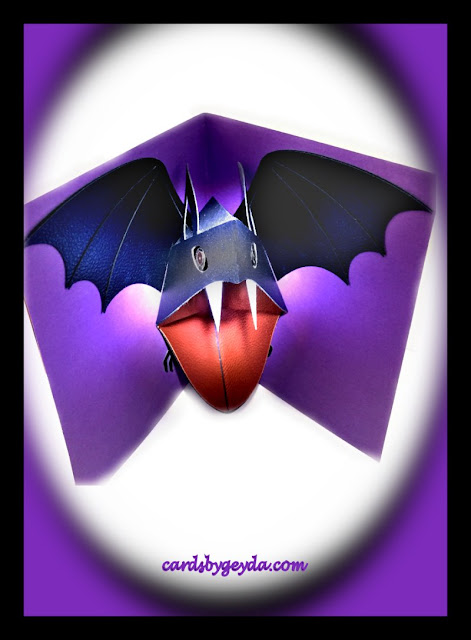
First up is this really unique Halloween Bat pop out card.  As you
can probably tell by now, I like lots of color and these little pumpkin
faces are no exception. I used green, yellow and orange pieces behind
the cutouts to create each delightful face. I found the perfect rainbow
ribbon to add a fun bow on top.


EEK!!!!      POP!!!
Yep, here's my Bat in all his glory! 

What was that saying from Casablanca with Humphrey Bogart and Ingrid Bergman?
Here's looking at ya kid! hehe

When you open up this card, he pops out to greet you. I cut 
him out in my Cricut Maker and used Faux pebbled leather 
and paper. This is  the first time using Cricut pebbled Faux 
leather and it cut just like butter and it was also easy to glue. 

Can you imagine your recipient's face when they open
this card and feel the bumpy leather. hehe
Makes him look Real. EEK!
A WOW card for sure.

Here's a close up picture of his wings and mouth. I added a large 
red sequin to his eyes and also later added glitter to his teeth.

This is the back of the card that I embossed and cut the oval 
a little smaller so it would have a black border. Oh, I found
the little Arsenic card in my Tim Holtz stash and thought
that would be a perfect touch to a surprise ending. hehe
You can stamp your sentiment or write a little note.
Here's the envelope to match with the pumpkin face.
Super wow card for all your Halloween guests or family and friend to
enjoy. Very easy to assemble with Bird's step by step video tutorial.
I think I'm going to send this to my daughter that mentioned they
saw a bat near their roof one time. Won't she be surprised when
she opens this one. hehe 

How about a Freebie Halloween card from Bird!
Plus get a glimpse of charming Lilly.

Click on the link below to get this Free Happy Halloween card.


That's it folks for another day in my crafty room.
I hope that I've inspired you to start your Halloween making
early and even be adventurous and try using Faux leather on
some of these incredible creations. I'm sure they will be a
WOW creation.
Have a Great week!
Hugs,
Misty


Thursday, September 21, 2017

Happy Camper Caravan Cards Magnet and Vinyl Bag


Hello again my crafty friends. I just got back from watching my
daughters dog, Charly. Yes, she's the star of the show today lol
Isn't she a sweetie and she was so good.
 I had to take her up and down those stairs for over
a week and fell down them while I was at it. ha Yep, I'm still sore.:(
And.........

My Katie got to go up and down those stairs as well, but one fall
was enough for me. lol
Sitting on lots of Pillows now!
I came to the conclusion that I do Not like Stairs. ;)


I'm a Happy Camper to be Home Sweet Home, so I just had to make this
cute Caravan Camper Vinyl bag.
Caravan by Bird
 http://www.birdscards.com/store/index.php?route=common/home
My daughter gave me a Heat Press for my Birthday and I thought I would
try it out on this bag. So quick and easy .
I opened the Caravan file in Design Space and added a couple extras
to the bag. I love how it turned out.


I made this one smaller, into a refrigerator Magnet. I pop dotted the curtains
and added the pull down curtain. So fun and easy, just add a tiny
magnet to the back and it's ready to decorate someones fridge or
any metal surface.

Here's the card that I made before I left, but didn't have time to post it.
I added a little kitty charm in the window and embossed both the
curtains and door and added the perfect little door handle.

This reminds me of the I Love Lucy episode "The Long Long Long Trailer.
I loved that show!

This was my second card that I had fun making. The diamond paper and
 embossing folder worked perfectly. If you look closely you can see
the embossed roses on the curtains and little potted plant in the window.
So easy and fun to make for most any occasion.

This is Birds pretty pink and white Caravan with the matching
envelope. Soooo cute!

I believe the file is in Birds Facebook group "Birds SVGs Group" here
https://www.facebook.com/groups/1783926958585879/

How about a Freebie from Bird!!

This adorable 3D Birdhouse and cards are FREE

Click on the link below to get the Birdhouse collection.

http://www.birdscards.com/store/index.php?route=product/product&path=87&product_id=50


That's it for another fine day in Apple Valley my friends.
I hope that I've inspired you once again and remind you
to be very careful on those stairs if you happen to come across any. haha
Have a wonderful week and weekend!
Hugs,
Misty

Monday, July 31, 2017

Vintage Wedding Clock Mantle Paper Cage Clocks


Hello my crafty friends!
YES, this lovely clock is made of Paper, using my Eclips cutting
machine, but you can use the Cricut Explore machine also.
This gorgeous clock was an inspiration and a challenge from Cherry
Lynn Young on the Cricut Facebook site. She so kindly shared the
cut file in Cricut Design Space and also her tutorial.  You will need to
have the retired Ornamental Iron cartridge in order to cut this Wedding clock.
 It's definitely a WOW and treasured keepsake.
Cherry has been so nice as to share her other clocks that use
only Cricut access files, so everyone that owns a Cricut Explore and
 has access can create a fantastic clock.

And as you will see as you scroll down, there are many of her fun
clocks that you can make. She is in the Let's Learn Cricut Explore
 Facebook group, so you can follow her if you like.

Check out her Gallery of all the clocks here
https://www.facebook.com/cherrylynnyoungartist/


She is so talented and creative and an inspiration to all.

This is the Wedding clock, decorated with white and gold papers.
The feet are brass from Tim Holtz, but you can get them from
AliExpress for less. I accented with pearls on the rim of the
top and some on the flowers.  It does take some time
to make, but you can follow her tutorial step by step.
Gorgeous Clock!

This is the back with a golden key cut with shiny gold paper and
layered four times. All four sides have four layers also to make it sturdy.
 The door opens so you can change the clock
 battery and the latch is from Hobby Lobby "Woodpile", but
can be purchased also at AliExpress.


Art Nouveau designed clock by Cherry Lynn Young
This is a gorgeous clock using the Cricut Cardrige,
Art Nouveau. I love her beautiful coordinating colored papers.

Here's the link for the Art Nouveau Clock in Design Space.
FREE
https://design.cricut.com/#/design/63634353


This is her Mickey Mouse clock that is simply
adorable and would make a delightful gift and keepsake
for someone special on your list.
If you have Cricut Design Space the file is below.
FREE

And this old time 50's oldies is a Must make for all you
rock and rock enthusiasts. So cool and gotta love the clock
hands, also from AliExpress.
Here's the link for the 50's clock if you have Design Space
FREE
https://design.cricut.com/#/design/63866644


This is Cherry's newest clock. It's a bit smaller than her
original ones and I believe uses Cricut designs. So pretty
with the intricate clock face and lace top, adorned with
gold up the sides and feet to match.
Beautiful clock!
Here's the link for the petite blue clock if you have Cricut Design Space.
FREE
https://design.cricut.com/#/design/64314251


This is the back with her white and gold key and golden heart
with a pearl for the latch. So many ways to decorate these
beautiful clocks and they will surely be treasured for years.

I Love my clock with all it's elegance and beauty and will
treasure it for many years. I am thinking of making the Art
Nouveau clock for someone special and also the cute Mickey
Mouse or the Tinker Bell. They are all gorgeous gorgeous clocks
 and will bring many happy smiles to anyone.

That's it my crafty friends for another day in my craft room.
I hope that I've inspired you to be creative and think out of the
box to create something amazing.
They say if there's a will, there's a way!
Happy crafting my friends and have a pleasant week!

Hugs,
Misty